


Direct sowing: a cultivation operation in which seeds are sown directly into the soil in which they will be grown.
We often think that direct seeding is the easy option to indoor seeding. There are, in fact, advantages and disadvantages to direct sowing: it’s true that outdoors, Mother Nature regulates many parameters on her own. Exposed to nature’s elements, our little seeds and seedlings are less protected, their germination rate is usually lower and they risk being eaten by animals and insects, but the survivors are generally hardier. Finally, we can start more of them, but thinning operations are not as comfortable as indoors.
Direct seeding or indoor seeding: choosing the right strategy
Is it then just a matter of personal preference? No, there are situations where one type of seeding is clearly more advantageous.
Direct seeding is often preferred:
- For plants that are sensitive to transplanting
- When cultivated quantities are too large for our internal accommodation capacity (e.g. flower fields)
- If you want to let Mother Nature do the stratification (by sowing in autumn)
- If you want to sow more and invest less in care
Conversely, we prefer indoor seedlings
- If you need to extend the season to harvest or flower
- If you want to produce “primeur” vegetables
- To protect tender seedlings from voracious slugs or the eggs of certain flies
- To stay one step ahead of weeds
- For the pleasure of nurturing our seedlings
- If natural mulches are used, when planting seedlings, immediately installs the mulch and prevents weeds from seeding.

tisanji guides you in your choice of planting strategy
While there is no universal truth, for some cultures there are sometimes more advantageous choices.
When an option really isn’t ideal
If we believe that one of the choices is really not recommended (for example: starting carrots from indoor seedlings), then we simply won’t offer it as a possible planting strategy.
If one option is more advantageous than the other
In the task details, we frequently add notes to help you choose between direct or indoor seeding.

If a choice does not suit the length of your growing season
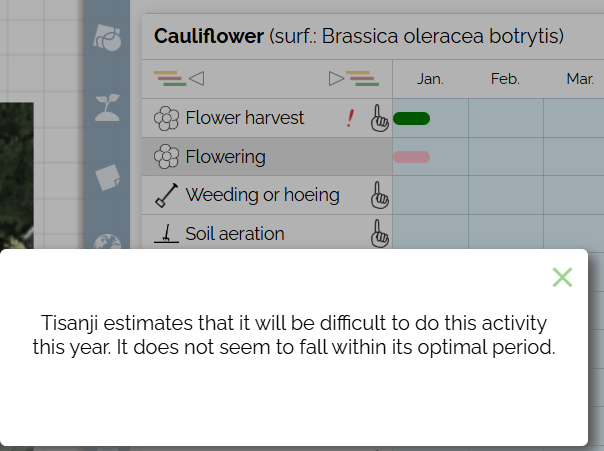
If the choice is actually based on the length of your season (for example: direct-seeding cauliflower in Lac-Saint-Jean), tisanji will keep your choices, but on the calendar you’ll see a “!” to warn you of possible problems at sowing time.
Preparing the soil before direct seeding
Preparing the plot in which you will be sowing is a decisive step towards success. The first thing to do is to check the optimum conditions for a plant and determine whether any amendments will be necessary. To do this, you can look at the information on the seed packet, but unfortunately this is often incomplete and you’ll have to look harder if you don’t know the plant in question.
Use the tisanji factsheets to find out about ideal growing conditions.
The plant sheets are available on the website and in the application
Everyone can access the plant cards, and you don’t even need to have an account with tisanji. However, users of the application can access their garden’s plant cards with a single click.

- From the website, click on the word “plant card”.
- From the application, click on the “Complete file” icon.
To go one step further in optimizing the placement of your plants
The article Optimize your vegetable garden plan according to your resources and desires will help you find the perfect spot for your plant.
Ideally, you choose plants that will thrive in the natural conditions your land offers. That’s the secret to creating beautiful gardens with ease. In the near future, I intend to write an article on how to amend your soil to bring it closer to the growing conditions of the plants you want to have. For now, let’s assume that the natural conditions of your soil are close to those required by your plants.
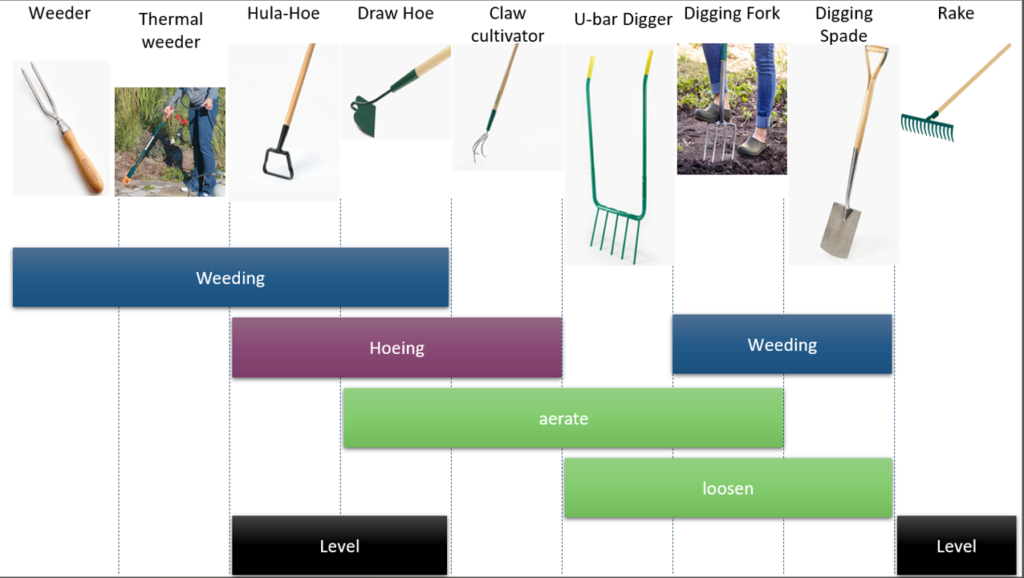
Steps to prepare an area before direct seeding
- Weeding or hoeing: if there are weeds occupying the space, remove them. Weeds often survive burial, so their roots will be deeper and more difficult to remove, which is what we want to avoid. If they are green manures or non-invasive plants, they can be mowed and buried.
- Loosen and aerate the soil, for example with a grelinette (broadfork) or spading fork. If the soil is clayey, you can take advantage of this step to bury (to the depth of the grelinette or spading fork) some of the old mulch, which will help enrich and decompact the soil on the long term.
- Amend the soil, for example by adding compost to the surface
- Hoeing the soil. The surface crust is broken and organic matter is mixed with the surface topsoil.
- Level out the soil. Depending on the size of the surface, you can use a rake; on small surfaces, I do this step with circular movements of my hands.
A few definitions
Weeding : a cultivation operation consisting in removing unwanted plants. Weeding can be done by hand, with a weeder, a spade, a hoe, a weed puller or a thermal weeder. For deep-rooted plants, I prefer the weed puller and the weeder. The operation then consists in uprooting the weed, trying to remove the root completely.
Hoeing: a cultivation operation that consists of stirring the soil surface using a three-toothed claw or hoe. Hoeing dries out weed seeds and prevents them from germinating. Hoeing is highly recommended, and even essential for those who don’t mulch their soil. Hoeing should be carried out every 2 weeks, in sunny, dry weather. We must be careful not to damage our plants, either above or below ground. As well as giving the soil an attractive appearance, hoeing brings the following benefits:
- Reduces water loss through runoff
- Reduces water loss through evaporation
- Oxygenate the soil
- Stimulates microbial activity
- Releases nutrients
The false seeding technique (to control weeds)
False seeding: a cultivation operation in which the soil is prepared as if for direct seeding or planting, but without actually doing so, in order to create conditions conducive to weed growth. Then, when the weeds have sprouted a few days later and are at the “white thread” stage, i.e. just a few centimeters tall and with white stems, they are killed with a hoe. As the Queen of Hearts would say in Alice in Wonderland: “Off with their heads!”
It’s a technique that can be used for any crop, but especially for those that are difficult to weed once established. I’m talking here about carrots, onions, garlic, radishes and so on.
It’s very effective for quickly reducing the seed bank lying dormant in your soil, just waiting for the opportunity to grow and give you a hard time.
N.B. VERY IMPORTANT! If you use false seeding, follow all the pre-transplant steps EXCEPT fertilization. You don’t want to give them the right nutrients reserved for your plants.
Different methods for direct seeding
On the fly

Broadcast sowing evokes the rather romantic image of the sower tossing the seeds on the fly. This technique is particularly well-suited to fine seeds that are to be sown over a large area: grass, oats, seed mixes intended to cover large surfaces at random.
This technique allows you to sow large quantities quickly. As you sow a lot, it’s not a big deal if the germination rate is lower than with more controlled techniques. The challenge is to achieve a regular density of seeds and to bury the seeds that need burying.
Broadcast seeding technique

I remember seeing my grandmother master this technique: her movement was circular, and the seeds were evenly distributed along the whole length of the movement, so as to achieve an even concentration over the entire surface. For those who haven’t mastered the technique, we sometimes see the use of a seeder, also known as a fertilizer spreader, especially for lawn sowing. If you’re broadcasting very small seeds, it’s a good idea to mix them with sand (or some other substrate whose grains have about the same volume as the seeds to be sown) to prevent them from becoming too dense . In this way, a handful of seed/sand mixture will contain fewer seeds per throw.
With the exception of seeds that need light to germinate and should be placed above ground, to improve germination of our broadcast seeds, they should be buried to the ideal depth described on the seed sachet, or in the tisanji plant leaflet. There are several ways to achieve this. You can add a thin layer of soil, for example by passing it through a sieve over the seeded surface. You can also rake or drag a chain over the surface to bury some of the seeds.
Seed pellet

A variant of broadcast seeding is the seed pellet or seed bomb method, a technique now promoted by guerrilla gardeners to encourage biodiversity in environments where cultivation is difficult, and to green urban spaces. This technique is not new, however, having been around since antiquity.
We make “seed bombs” by mixing seeds with potting soil, compost and clay, which when wet will help build a ball that will hold all the ingredients together. All we have to do is throw our bomb on the ground and let nature take care of cultivating our seeds.
Direct seeding at controlled depths
For the best germination rate, we opt to make a hole before sowing. This allows us to control the depth of the seed. For over five centuries, tools have been developed to make sowing as efficient as possible. That said, the basic methodology remains the same:
- Digging a hole or furrow
- Place the seed
- Cover
Tools to help with seeding
It’s perfectly possible to sow seedlings with just your hands, but tools make life easier and sometimes guarantee better repeatability (same distance, same depth for the whole row). The choice of tool generally depends on the volume of seed to be sown.
Did you know? The first seed drills date back to Mesopotamia, then to China; in Europe, they were discovered in the 16th century and popularized in the 18th century.

Use of guide (stencil, stick, rope)
For small gardeners who work by hand, it’s useful to use guides to plant at regular distances… Here are a few ideas:
- Use a stencil. Universal stencils are available for purchase, or you can make your own. This can be done with a board, or with a geotextile that will remain in place to serve as mulch afterwards. All you have to do is make holes in the stencil at the distance required for your crop.
- Use the corner of a wooden plank at a 45-degree angle to cut the furrow.
- Use a string with evenly-spaced markers. Stretch the rope a few cm from the ground to indicate where to plant.
- Use a rake to which you can lengthen certain claws according to the desired spacing.
- Use seeds arranged on a ribbon; you can buy seeds on pre-prepared ribbons, or make your own ribbons.
Cluster sowing
Seed pocket: small hole into which several seeds are sown. This technique is generally used for seeds with a low germination rate.
Ideal conditions for direct seeding
Humidity
For our seedlings, we avoid soggy soil as well as completely dry soil. The easiest way to determine if you have the right level of humidity is to take a handful of soil in your hand: if the water runs off, the soil is too wet (if this is a recurring situation, you need to think about improving drainage). If, on the other hand, soil dust slips through your fingers, the soil is too dry and needs watering before sowing. In an ideal world, the handful of soil remains compressed when you open your hand, but loosens easily when you start to move.
The earth’s temperature
Every year is different. For example, this year my coltsfoot is two weeks later than last year. The tisanji software suggests sowing dates based on average temperature. Soil temperature plays a major role in the germination rate and ripening time. Ideally, soil temperature should be measured before sowing. This can be done using a geothermometer. You can also observe nature: before the lawn turns green, limit yourself to parsnips, onions, garlic and any autumn seedlings you may have forgotten to plant.
Sowing earlier doesn’t really save time. If the soil is too cold for the seed, it will wait before germinating. For example, spinach takes three weeks to germinate when the soil temperature is 4°C, whereas it germinates in 1 week if the soil temperature is 16°C.
Gardeners in a hurry will accelerate soil heating by using geotextiles or plastics to create a greenhouse effect. Look for long-lasting solutions that can be reused year after year.
Care after direct seeding
Water
New seedlings will need light, frequent watering.
Light watering: Choose delicate watering (a light rain or drizzle) at the start, to avoid moving your arrangement.
Frequent watering: your seedlings have tiny roots. A severe one-day drought may be enough to kill your seedling. On the other hand, creating slight shortages will encourage the seedling to develop a powerful and efficient root system.
Tip: use a sheet of newspaper to water your new seedlings.
The advantages of covering new seedlings with a sheet of newspaper before watering them
- The paper will quickly decompose and enrich your soil with nitrogen.
- Water will pass slowly through the leaf, maintaining a good level of humidity
- The leaf will protect the seeds from water jets that can displace them.
- Seeds will be less accessible to birds
Technical
Use only 1 layer of newspaper. The paper should not be glossy. It can be secured using stakes (e.g. those used for geotextile), or soil at the ends. Water the seedlings.
Do not use this technique for surface-sown seeds. These seeds need light to germinate and the sheet of paper would block out this light.
Thinning out your direct seedbeds
Because conditions for direct seeding are less controlled than for indoor seeding, we generally sow more seeds than the desired final spacing. Sometimes we sow in clumps, other times we sow closer together. A general rule is to thin out the plants as the leaves touch.
When thinning out seedlings sown in clumps, it’s best to cut off the aerial part of excess plants, as their roots are probably intertwined. Pulling out excess plants could damage the roots of the remaining plants, and the risk of damage increases as the plants grow.
If the seeds have simply been sown at a higher density than the final density, the plants can be gently pulled out.
Tip: in the vegetable garden, remember to eat thinned plants
I don’t know about you but I have a lot of trouble killing off baby plants that are overgrown in the garden. It’s important not to over-seed, but thinning is necessary if you want to be sure of having a full garden. For me, thinning is less painful when it comes to harvesting my first crops. A foretaste of the pleasure of having your own vegetable garden!
Many of the shoots in the vegetable garden are edible!
There are baby carrots, but don’t forget that the tops of several root vegetables are also edible: radish, turnip, kohlrabi, beet, rutabaga, garlic and onion. As for green vegetables, all aerial parts are edible “baby”: Swiss chard, spinach, lettuce, tetragonia, not forgetting certain microfoams such as those on corn, mustard and sunflower.
Note: the foliage of solanaceous plants is not edible.
It’s not the only one: of course, you have to check the edibility of any plant before eating it but there’s one big exception: the Solanaceae family! Tomatoes, peppers, eggplants, ground cherries, potatoes, ashwagandha, belladonna… almost all foliage in this family is toxic. These are plants that don’t get eaten much by pests but that does prevent us from using the young shoots that have been thinned out in our salads.
Hoeing
Hoeing is recommended throughout the season for crops not under mulch. The ideal frequency is around 10 to 15 days. If mulch is used, hoeing should be limited to preparing the soil before sowing or planting.
Mulch
If you’ve just direct seeded, you can’t mulch immediately. The mulch would act as a barrier to prevent the seedling from finding sunlight, and would die before we saw its first cotyledons. Preventing weeds from germinating is one of the reasons for mulching. So wait until the plant has its first true leaves before mulching. Generally speaking, mulch is completely removed from beds where direct seeding is carried out, as it slows down soil warming in spring.
In dry weather, which is rare in spring, mulch helps to keep the soil moist. In this case, maintain a spacing of 5 to 10cm between the seedling and the mulch.
Protection for direct seeding
Protection against cold
Sowing at the beginning of the season, or even a little before the ideal time, involves a certain risk due to the cold.
There are many options for protecting plants from the cold. It’s important that these tools can be removed or aired quickly on hot days, as heat can build up and do as much damage as frost.
- Use of tunnels; they can be made of transparent cloth or geotextiles that let in a large part of the light.
- Use of floating blankets; if these are light and the plants are already strong enough, they can simply be placed on top of the plants (if not, opt for tunnels).
- Use of a cold layer, the lid of which can be lifted on hot days
- Use of bells; we often see magnificent glass bells in photos, but their exorbitant price means that they are increasingly being replaced by plastic bells (less attractive and less insulating).
- Use homemade cloche made from a plastic container with the bottom removed; for larger plants, use a transparent mulch bag held together with wooden supports.

Did you know? For some plants, such as Solanaceae, cold damages plants at 6°C and above.
Although we’re talking about the date of the last frost, some plants require even more warmth before they can be planted in the garden.
Some exotic plants, including the popular Solanaceae family, are sensitive to cold well above freezing. These plants may survive a cool night, but exposure will slow their growth. That’s why it’s best to wait a while before planting them outdoors, or to take protective measures and keep an eye on the weather.
Pest control
Our seedlings are tender and delicious to many pests, including slugs, but also small rodents and birds.
- Above-ground screens: these can protect bulbs in autumn, and seeds and seedlings in spring.
- Can with bottom pierced around seedlings
For insects such as cabbage, carrot and onion flies, and lacewings, we generally use mesh and geotextile tunnels.
To go further in your seedling planning

The article on indoor sowing also contains some good tips.

Choosing the best location for your vegetable crops
The Laidback Gardener’s Seedlings: I highly recommend this book by Larry Hodgson, it offers a fairly extensive section of techniques and tips for all types of seedlings, but above all it provides detailed information for 350 plants on the optimum conditions for each different seedling. Information such as sowing date according to your climate, sowing depth, germination time and temperature is quickly available. The only drawback is that the book does not indicate how germination capacity is preserved over the years.